

")


Features
Why You'll Love Bulk Colonized Fruiting Blocks
- 🍄 Fast Results – Under proper fruiting conditions, mushrooms can begin to appear in as little as 5–10 days.
- 📦 Less Packaging, Better Value – The same premium fruiting blocks without retail packaging, helping reduce costs and waste.
- 🚚 Ideal for Commercial & High-Volume Growers – Perfect for farms, market vendors, restaurants, educational programs, and grow operations.
- 🍽️ Multiple Gourmet Varieties Available – Choose from a selection of popular gourmet mushroom species to fit your growing goals.
- 💪 Grow More for Less – A cost-effective way to expand your mushroom harvest without paying for individual retail packaging.
Colonized Fruiting Blocks – BULK
Your Price:
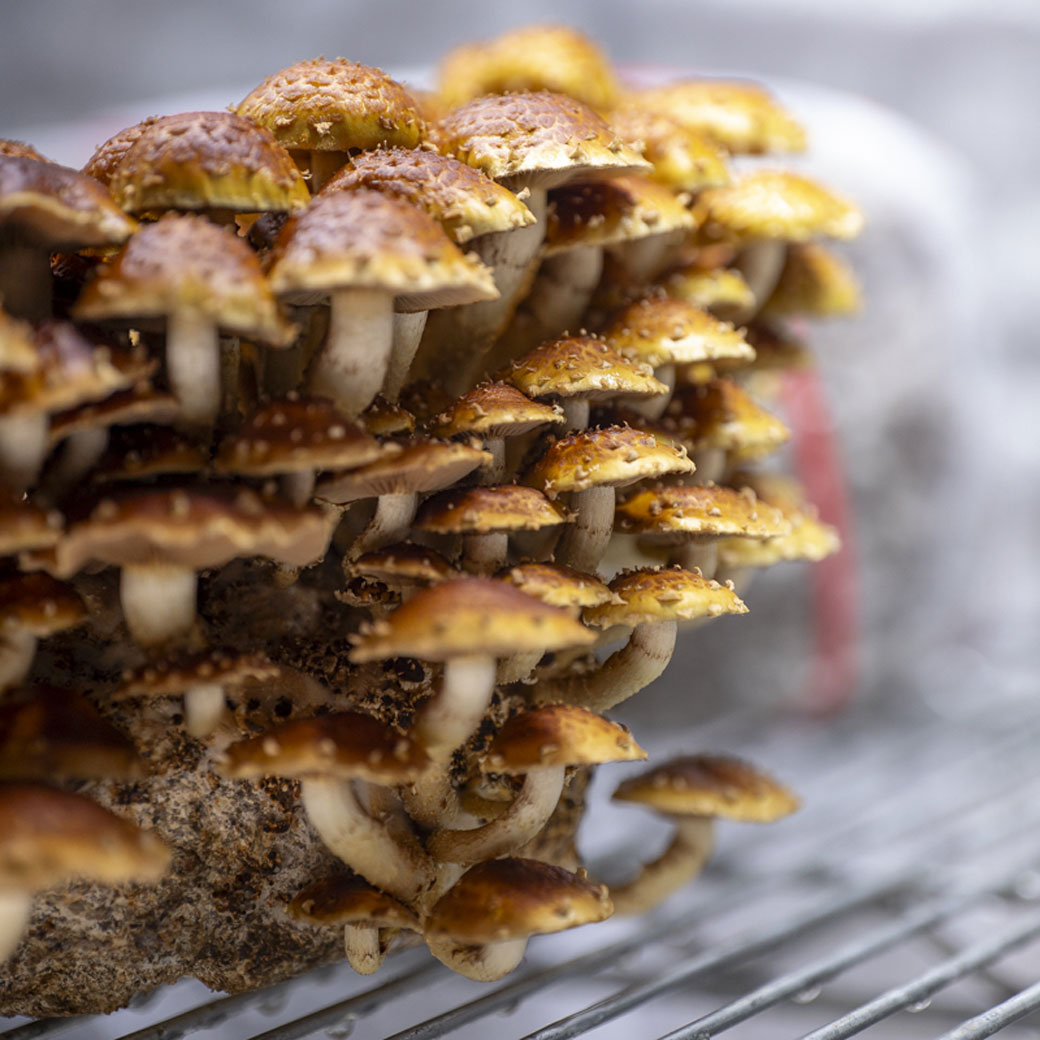
Bring the magic of mushroom growing into your home with Ready-to-Fruit Blocks –
NOW IN BULK! These fully colonized, easy-to-use grow blocks make it simple to grow your own beautiful mushrooms—no green thumb required.
Each block is grown and prepared by our team using premium substrate and shipped ready to start fruiting. If you can mist a houseplant, you can grow your own gourmet mushrooms with this kit.
**All bulk packs of colonized fruiting blocks must be sold in cases of 10**
Due to the delicate nature of live cultures, we cannot accept any returns or exchanges on these products. All sales are final.
Grow Mushrooms at Home
Experience the thrill of cultivating your own gourmet mushrooms at home with our BULK Colonized Fruiting Blocks. Perfect for beginners and seasoned growers alike, this all-in-one kit comes complete with a fully colonized substrate block, spray bottle, instructions, and humidity bag to ensure an easy, hassle-free growing experience.
Fast and Easy to Use
Simply mist the block daily, and within 4-14 days, you’ll begin to see clusters of delectable mushrooms. Each block is good for multiple harvests over a 2-month period and can be soaked between harvests to replenish moisture.
Technical Specifications
| Length Inches | |
|---|---|
| Width Inches | |
| Height Inches | |
| Product Weight | |
| Case Quantity | |
| Case Dimensions (L"xW"xH") | |
| Case Weight lbs |
| Materials | ||
|---|---|---|
| Thickness | ||
| Tensil Strength | ||
| Climate Suitability | ||
| Transmission Rate | ||
| Diffusion Rate | ||
| Custom Size Option | ||
| Bag Weight | ||
| Best Use | ||
| Category | Mushroom Grow Bags |
Instructions
Cut a 2–3 inch slit into the front of the bag and place the block somewhere with indirect light and stable room temperature.
Mist the opening with water 2–3 times per day to maintain surface moisture.
After about 10 days, you’ll start to see white, fluffy growth that expands into dense, toothy clusters.
Harvest when the spines are fully formed and the surface feels firm to the touch.
Continue misting after harvest to encourage a second flush.
Specifications
Species: Lion’s Mane (Hericium erinaceus)
Substrate: Wood-Based
Bag Type: Polypropylene Grow Bag with 0.2 Micron Filter
Fruiting Time: 10–14 days after setup
Instructions
To get started, simply cut a small “X” or a 2–3 inch slit in the front of the bag. Place your block somewhere with indirect light, like a kitchen counter or shelf. Mist the exposed area with water two to three times per day to keep the surface moist and encourage healthy growth.
Within just a few days, you’ll start to see vibrant pink mushrooms emerging from the cut. Continue misting daily, and you’ll be ready to harvest when the caps flatten out slightly and deepen in color. After your first flush, keep misting—you may get a second or even third crop from the same block.
Specifications
Species: Pink Oyster (Pleurotus djamor)
Substrate: Oak Sawdust, Soy Hulls
Fruiting Time: 5–10 days after setup
Instructions
Getting Started:
Your Black Pearl Oyster Mushroom Grow Kit arrives fully colonized and ready to fruit. Choose an indoor location with indirect light and stable temperatures. Grow tents (ideally) or on the kitchens countertops.
Ideal Conditions
- Temperature: 60–75°F
- Light: Indirect or ambient room light
- Location: Indoors, away from direct sunlight or heat sources
Using clean scissors or a sharp knife, cut a small “X” or slit on the front of the bag where indicated. This opening allows fresh air exchange and gives the mushrooms a place to form clusters.
Daily Care (The RMS Way):
- Mist the cut opening 2-3 times daily with spray bottle.
avoid pooling water inside the bag - Focus misting on the air around the opening, not directly on forming mushrooms
- Keep substrate moist but never waterlogged
- Ensure good ventilation—mushroom need fresh air to develop properly. Stale air can cause long stems and small caps.
- Within 5–10 days, small mushroom pins will begin to form at the opening. These pins will rapidly develop into full clusters over the next several days.
- Be patient—this variety takes slightly longer than pink or blue oysters but is worth the wait
Harvesting for Best Results:
Harvest your Black Pearl Oyster mushrooms when the caps are fully formed but still slightly curled at the edges. Cut or twist entire clusters at the base. The long edible stems are a bonus—don’t trim them off!
Getting Multiple Flushes (RMS Method):
After your first harvest, continue misting the block lightly once per day and allow it to rest for 7–10 days. Keep the block in the same growing environment.
Once new pins appear, resume regular misting. Many Black Pearl Oyster grow kits will produce a second flush and sometimes more, with slightly smaller but still high-quality mushrooms.
If growth slows, increasing fresh air and maintaining steady humidity often helps trigger new clusters.
Instructions
Getting Started:
- Remove block from shipping box and inspect for white mycelium coverage (this is normal and good!)
- Find the pre-cut opening or cut a 4-6 inch X-shape on one side of the bag
- Place in indirect light with good air circulation
- Keep at room temperature (60-75°F is ideal, but tolerates 50-80°F)
Daily Care:
- Mist the cut opening 2-3 times daily—we recommend mornings and evenings
- Aim for the air around the opening, not directly at forming mushrooms
- Keep substrate moist but not waterlogged (if you see pooling water, reduce misting)
- Ensure good air circulation (crack a window or use a small fan on low)
- Within 7-10 days, you’ll see white “pins” forming—this means success!
Harvesting for Best Results:
Harvest when caps begin to flatten and edges start to curl upward. Tree Oysters are best when picked young—as they age, the flesh becomes tougher. Twist and pull entire clusters from the base, or cut with a clean knife. Don’t leave stems behind as they can invite contamination.
Getting Multiple Flushes:
After first harvest, rest the block for 7-10 days without misting. Then submerge the entire block in clean water for 12-24 hours (we use a cooler or large bowl). Drain completely and resume regular misting. Second and third flushes typically appear within 1-2 weeks and can be just as productive as the first.
Pro Tip from Our Team:
If your block seems to stall, try the “shock method”—place it in the refrigerator overnight, then return to normal growing conditions. This temperature change often triggers pinning.
Specifications
Species: Pleurotus ostreatus (Grey Oyster)
Block Weight: 5 lbs fully colonized substrate
Substrate Composition: Premium hardwood sawdust blend
Growing Time: 7-10 days to first pins, 3-5 days from pins to harvest
Temperature Range: 50-80°F (ideal: 60-70°F)
Humidity Needs: 85-95% (achieved through regular misting or humidity tent)
Light Requirements: Indirect natural or artificial light (mushrooms need light to develop properly)
Expected Harvests: 2-3 flushes per block with proper care
Total Yield: 1-2 lbs fresh mushrooms
Shelf Life: Start growing within 2 weeks of receipt for best results
Difficulty Level: Beginner-friendly—one of our most forgiving varieties
Best For: Cooking, meat alternatives, beginners learning mushroom cultivation, year-round growing
Instructions
Getting Started:
- Before opening the bag, gently massage the top surface of the grow block through the plastic. This helps loosen the mycelium and encourages even pin formation right where the mushrooms will fruit.
- Place the unopened block in its growing location and allow the mushrooms to begin pinning toward the top. Once you see pins forming through the plastic, it’s time to open the grow bag.
- Using a clean knife, cut the top of the bag just below the seal. This creates a built-in microclimate that helps the mushrooms develop thick stems and well-formed caps. As the mushrooms grow, you can gradually roll the bag down to about 5 inches above the substrate layer to increase fresh air while still maintaining humidity.
Ideal Conditions
- Temperature: 50–55°F
- Humidity: 85-90%
- Fresh Air Exchange: Moderate
- Fruiting Method: Indoors. Bags in growth chamber, monotub
Daily Care (The RMS Way):
- Keep the bag intact until pins form. This helps maintain a stable, humid microclimate during the most sensitive stage
- Watch for pins. Pins typically start on the top surface 7–14 days after setup/opening (depending on conditions).
- When pins are 1/2–1 inch tall:
Using a clean knife or scissors, cut a 2–3 inch opening at the very top of the bag, just below the heat seal. This protects humidity while allowing better airflow as mushrooms size up. Only begin light misting at this stage. - Monitor closely and adjust airflow if pinning is slow. Ensure consistent Fresh Air Exchange (FAE) in the fruiting chamber. Lower CO₂ levels are crucial to initiate pinning. Monitor closely and adjust airflow if pinning is slow.
Harvesting for Best Results:
Pick when mushrooms are fully developed but before they over-mature. Gently twist at the base, or cut cleanly with a knife where the stem meets the block.
Single-fruiting only:
King Trumpet blocks are often considered “single-fruiting” and can be more contamination-prone after the first harvest, so a second flush is not reliably expected
Instructions
Make a 2–3 inch cut just beneath the filter patch on the front of the bag. Place the block in a spot with indirect light and stable room temperature. Mist around the cut and filter area 2–3 times per day to maintain surface moisture. Within 10–14 days, you’ll start to see mushroom caps forming near the top of the block. Harvest when caps have opened slightly but before they flatten out. Keep misting to encourage future flushes.
Specifications
Species: Shiitake (Lentinula edodes)
Substrate: Oak Sawdust, Soy Hulls
Bag Type: Polypropylene Grow Bag with 0.2 Micron Filter
Fruiting Time: 10–14 days after opening
Instructions
Getting Started:
- Remove block from shipping box
- Cut a large X-shape on one side of the bag, fold excess bag material and secure with rubber band or tape. Place bag with X cut in fruiting chamber or area with the X cut pointing upwards.
- Place in indirect light with good air circulation
- Keep in cooler location (55-70°F ideal for fruiting)
- Give the bag a good slap to encourage fruiting.
Daily Care (The RMS Way):
- Mist the cut opening 2-3 times daily with spray bottle
- Focus misting on the air around the opening, not directly on forming mushrooms
- Keep substrate moist but never waterlogged
- Ensure good ventilation—Chestnuts need fresh air to develop properly
- Primordia (baby mushrooms) appear within 1-2 weeks and take an additional 2-3 weeks to mature
- Be patient—this variety takes slightly longer than oysters but is worth the wait
Harvesting for Best Results:
Harvest mushrooms while caps are still quite concave for longer storage life. The mushrooms grow in dense clusters that are easy to harvest all at once. Cut or twist entire clusters at the base. The long edible stems are a bonus—don’t trim them off!
Getting Multiple Flushes (RMS Method):
A second flush is typically available from the same kit about two weeks later. After first harvest, rest the block for 10-14 days. Then soak in cold water for 24 hours, drain completely, and resume misting. The cooler rest period helps trigger the next flush.
Pro Tip from Our Team:
Chestnut mushrooms love cooler temperatures. If growing in warmer months, place your block in the coolest spot in your home (basement, north-facing room, or near A/C). Fall and winter are ideal seasons for this variety.
Details
Grow Mushrooms at Home
Experience the thrill of cultivating your own gourmet mushrooms at home with our BULK Colonized Fruiting Blocks. Perfect for beginners and seasoned growers alike, this all-in-one kit comes complete with a fully colonized substrate block, spray bottle, instructions, and humidity bag to ensure an easy, hassle-free growing experience.
Fast and Easy to Use
Simply mist the block daily, and within 4-14 days, you’ll begin to see clusters of delectable mushrooms. Each block is good for multiple harvests over a 2-month period and can be soaked between harvests to replenish moisture.
Specifications
Instructions
LION'S MANE
Instructions
Cut a 2–3 inch slit into the front of the bag and place the block somewhere with indirect light and stable room temperature.
Mist the opening with water 2–3 times per day to maintain surface moisture.
After about 10 days, you’ll start to see white, fluffy growth that expands into dense, toothy clusters.
Harvest when the spines are fully formed and the surface feels firm to the touch.
Continue misting after harvest to encourage a second flush.
Specifications
Species: Lion’s Mane (Hericium erinaceus)
Substrate: Wood-Based
Bag Type: Polypropylene Grow Bag with 0.2 Micron Filter
Fruiting Time: 10–14 days after setup
PINK OYSTER
Instructions
To get started, simply cut a small “X” or a 2–3 inch slit in the front of the bag. Place your block somewhere with indirect light, like a kitchen counter or shelf. Mist the exposed area with water two to three times per day to keep the surface moist and encourage healthy growth.
Within just a few days, you’ll start to see vibrant pink mushrooms emerging from the cut. Continue misting daily, and you’ll be ready to harvest when the caps flatten out slightly and deepen in color. After your first flush, keep misting—you may get a second or even third crop from the same block.
Specifications
Species: Pink Oyster (Pleurotus djamor)
Substrate: Oak Sawdust, Soy Hulls
Fruiting Time: 5–10 days after setup
BLACK PEARL OYSTER
Instructions
Getting Started:
Your Black Pearl Oyster Mushroom Grow Kit arrives fully colonized and ready to fruit. Choose an indoor location with indirect light and stable temperatures. Grow tents (ideally) or on the kitchens countertops.
Ideal Conditions
- Temperature: 60–75°F
- Light: Indirect or ambient room light
- Location: Indoors, away from direct sunlight or heat sources
Using clean scissors or a sharp knife, cut a small “X” or slit on the front of the bag where indicated. This opening allows fresh air exchange and gives the mushrooms a place to form clusters.
Daily Care (The RMS Way):
- Mist the cut opening 2-3 times daily with spray bottle.
avoid pooling water inside the bag - Focus misting on the air around the opening, not directly on forming mushrooms
- Keep substrate moist but never waterlogged
- Ensure good ventilation—mushroom need fresh air to develop properly. Stale air can cause long stems and small caps.
- Within 5–10 days, small mushroom pins will begin to form at the opening. These pins will rapidly develop into full clusters over the next several days.
- Be patient—this variety takes slightly longer than pink or blue oysters but is worth the wait
Harvesting for Best Results:
Harvest your Black Pearl Oyster mushrooms when the caps are fully formed but still slightly curled at the edges. Cut or twist entire clusters at the base. The long edible stems are a bonus—don’t trim them off!
Getting Multiple Flushes (RMS Method):
After your first harvest, continue misting the block lightly once per day and allow it to rest for 7–10 days. Keep the block in the same growing environment.
Once new pins appear, resume regular misting. Many Black Pearl Oyster grow kits will produce a second flush and sometimes more, with slightly smaller but still high-quality mushrooms.
If growth slows, increasing fresh air and maintaining steady humidity often helps trigger new clusters.
GREY OYSTER
Instructions
Getting Started:
- Remove block from shipping box and inspect for white mycelium coverage (this is normal and good!)
- Find the pre-cut opening or cut a 4-6 inch X-shape on one side of the bag
- Place in indirect light with good air circulation
- Keep at room temperature (60-75°F is ideal, but tolerates 50-80°F)
Daily Care:
- Mist the cut opening 2-3 times daily—we recommend mornings and evenings
- Aim for the air around the opening, not directly at forming mushrooms
- Keep substrate moist but not waterlogged (if you see pooling water, reduce misting)
- Ensure good air circulation (crack a window or use a small fan on low)
- Within 7-10 days, you’ll see white “pins” forming—this means success!
Harvesting for Best Results:
Harvest when caps begin to flatten and edges start to curl upward. Tree Oysters are best when picked young—as they age, the flesh becomes tougher. Twist and pull entire clusters from the base, or cut with a clean knife. Don’t leave stems behind as they can invite contamination.
Getting Multiple Flushes:
After first harvest, rest the block for 7-10 days without misting. Then submerge the entire block in clean water for 12-24 hours (we use a cooler or large bowl). Drain completely and resume regular misting. Second and third flushes typically appear within 1-2 weeks and can be just as productive as the first.
Pro Tip from Our Team:
If your block seems to stall, try the “shock method”—place it in the refrigerator overnight, then return to normal growing conditions. This temperature change often triggers pinning.
Specifications
Species: Pleurotus ostreatus (Grey Oyster)
Block Weight: 5 lbs fully colonized substrate
Substrate Composition: Premium hardwood sawdust blend
Growing Time: 7-10 days to first pins, 3-5 days from pins to harvest
Temperature Range: 50-80°F (ideal: 60-70°F)
Humidity Needs: 85-95% (achieved through regular misting or humidity tent)
Light Requirements: Indirect natural or artificial light (mushrooms need light to develop properly)
Expected Harvests: 2-3 flushes per block with proper care
Total Yield: 1-2 lbs fresh mushrooms
Shelf Life: Start growing within 2 weeks of receipt for best results
Difficulty Level: Beginner-friendly—one of our most forgiving varieties
Best For: Cooking, meat alternatives, beginners learning mushroom cultivation, year-round growing
KING TRUMPET
Instructions
Getting Started:
- Before opening the bag, gently massage the top surface of the grow block through the plastic. This helps loosen the mycelium and encourages even pin formation right where the mushrooms will fruit.
- Place the unopened block in its growing location and allow the mushrooms to begin pinning toward the top. Once you see pins forming through the plastic, it’s time to open the grow bag.
- Using a clean knife, cut the top of the bag just below the seal. This creates a built-in microclimate that helps the mushrooms develop thick stems and well-formed caps. As the mushrooms grow, you can gradually roll the bag down to about 5 inches above the substrate layer to increase fresh air while still maintaining humidity.
Ideal Conditions
- Temperature: 50–55°F
- Humidity: 85-90%
- Fresh Air Exchange: Moderate
- Fruiting Method: Indoors. Bags in growth chamber, monotub
Daily Care (The RMS Way):
- Keep the bag intact until pins form. This helps maintain a stable, humid microclimate during the most sensitive stage
- Watch for pins. Pins typically start on the top surface 7–14 days after setup/opening (depending on conditions).
- When pins are 1/2–1 inch tall:
Using a clean knife or scissors, cut a 2–3 inch opening at the very top of the bag, just below the heat seal. This protects humidity while allowing better airflow as mushrooms size up. Only begin light misting at this stage. - Monitor closely and adjust airflow if pinning is slow. Ensure consistent Fresh Air Exchange (FAE) in the fruiting chamber. Lower CO₂ levels are crucial to initiate pinning. Monitor closely and adjust airflow if pinning is slow.
Harvesting for Best Results:
Pick when mushrooms are fully developed but before they over-mature. Gently twist at the base, or cut cleanly with a knife where the stem meets the block.
Single-fruiting only:
King Trumpet blocks are often considered “single-fruiting” and can be more contamination-prone after the first harvest, so a second flush is not reliably expected
SHIITAKE
Instructions
Make a 2–3 inch cut just beneath the filter patch on the front of the bag. Place the block in a spot with indirect light and stable room temperature. Mist around the cut and filter area 2–3 times per day to maintain surface moisture. Within 10–14 days, you’ll start to see mushroom caps forming near the top of the block. Harvest when caps have opened slightly but before they flatten out. Keep misting to encourage future flushes.
Specifications
Species: Shiitake (Lentinula edodes)
Substrate: Oak Sawdust, Soy Hulls
Bag Type: Polypropylene Grow Bag with 0.2 Micron Filter
Fruiting Time: 10–14 days after opening
CHESTNUT
Instructions
Getting Started:
- Remove block from shipping box
- Cut a large X-shape on one side of the bag, fold excess bag material and secure with rubber band or tape. Place bag with X cut in fruiting chamber or area with the X cut pointing upwards.
- Place in indirect light with good air circulation
- Keep in cooler location (55-70°F ideal for fruiting)
- Give the bag a good slap to encourage fruiting.
Daily Care (The RMS Way):
- Mist the cut opening 2-3 times daily with spray bottle
- Focus misting on the air around the opening, not directly on forming mushrooms
- Keep substrate moist but never waterlogged
- Ensure good ventilation—Chestnuts need fresh air to develop properly
- Primordia (baby mushrooms) appear within 1-2 weeks and take an additional 2-3 weeks to mature
- Be patient—this variety takes slightly longer than oysters but is worth the wait
Harvesting for Best Results:
Harvest mushrooms while caps are still quite concave for longer storage life. The mushrooms grow in dense clusters that are easy to harvest all at once. Cut or twist entire clusters at the base. The long edible stems are a bonus—don’t trim them off!
Getting Multiple Flushes (RMS Method):
A second flush is typically available from the same kit about two weeks later. After first harvest, rest the block for 10-14 days. Then soak in cold water for 24 hours, drain completely, and resume misting. The cooler rest period helps trigger the next flush.
Pro Tip from Our Team:
Chestnut mushrooms love cooler temperatures. If growing in warmer months, place your block in the coolest spot in your home (basement, north-facing room, or near A/C). Fall and winter are ideal seasons for this variety.
